To sharpen a Hobart meat slicer, start by ensuring you have the right tools and cleaning the blade thoroughly. Turn off and unplug the slicer for safety, then apply sharpening oil to the blade. Install the sharpening stones correctly and secure the blade in place. Plug in the slicer and initiate the sharpening process, allowing the blade to be sharpened for about 30 seconds with consistent movement. Remember to maintain cooling gaps to prevent overheating. Repeat the sharpening process three times, adhering to the recommended intervals. Sharpen your Hobart meat slicer every 3 to 4 months for optimal performance.
Hobart Meat Slicers:

Hobart meat slicers are popular kitchen appliances known for their precision and durability. Whether used in households or restaurants, these slicers make meat cutting as easy as slicing fruit. Their high-quality build ensures long-lasting performance, making them a preferred choice for many customers.
Things Needed to Sharpen the Hobart Meat Slicer:
- Sharpening stone
- Alcohol or ethanol
- Cloth
- Water
- Lubricating oil
Steps to Sharpen a Hobart Meat Slicer:
Preparing for Sharpening:

Ensure you have the right tools:
Before sharpening, make sure you have a blade sharpener that is compatible with your Hobart slicer. If one was not provided with the product, consider purchasing a sharpening tool that has good reviews and is suitable for your slicer model.
Clean the blade:
Before sharpening, it’s important to clean the blade thoroughly. Use alcohol or ethanol to remove any grease or residue that may have accumulated. Additionally, you can clean the blade with water and a dry cloth to eliminate dust or debris, ensuring optimal sharpening.
Turn off and unplug the slicer:
As a safety precaution, switch off the slicer and unplug it from the power source before starting the sharpening process. This prevents any accidental injuries while handling the blade.
Apply sharpening oil:
Choose a high-quality sharpening oil recommended by the manufacturer or specifically designed for your slicer model. Apply the oil to the blade, ensuring it is evenly coated. This lubrication facilitates the sharpening process and helps maintain the blade’s integrity.
Installing the Sharpening Stones:

Locate the device lock button:
Refer to the user manual of your Hobart slicer to locate the device lock button. Unscrew and remove it from the base shaft.
Install the sharpening stones:
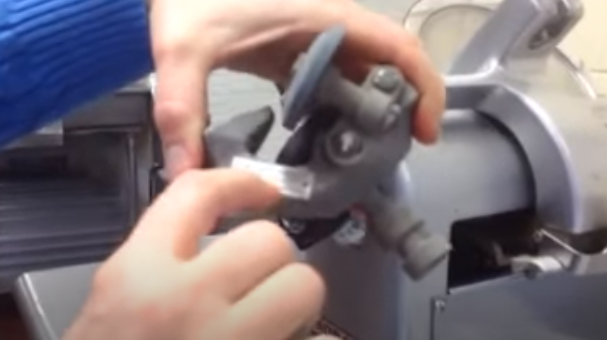
Position the sharpening stones correctly according to the manufacturer’s instructions. Once in place, screw the device lock button back onto the base shaft. Ensure a secure fit, as this will stabilize the stones during sharpening.
Sharpening Process:

Secure the blade:
Place the blade on the sharpening stones and tighten the lock knob until you hear a distinct clicking sound. This ensures that the blade is securely fastened and ready for sharpening.
Plug in the slicer:
Connect the slicer to the power source and initiate the sharpening process. Allow the blade to be sharpened for approximately 30 seconds, ensuring consistent movement across the stones.
Maintain gaps to prevent overheating:
To prevent overheating due to friction, pause the sharpening process for a 4-second interval after every 30 seconds of sharpening. This gap allows the blade to cool down and minimizes excessive wear.
Repeat sharpening cycles:
Repeat the sharpening process three times, adhering to the 30-second sharpening intervals and 4-second cooling gaps. Be cautious not to overdo the sharpening, as excessive wear can compromise the blade’s longevity and performance.
Steps After Sharpening:
After sharpening your Hobart meat slicer, there are a few important steps to follow to ensure proper reassembly and cleaning:
Reassemble the Slicer:
Carefully put all the components of the slicer back in their original positions. Take your time to ensure that everything is properly fixed and aligned. This step is crucial for the slicer to function correctly.
Rinse with Alcohol:
Once you have completed the sharpening process, remove the plug from the power source. Then, using a clean cloth or sponge soaked in alcohol, thoroughly wipe down the slicer. This step helps remove any debris or residue that may have accumulated during sharpening.
Clean with Water:
After rinsing with alcohol, cleaning the slicer with clean water is important to eliminate any remaining alcohol or residue. This step ensures the slicer is hygienic and ready for use. Use a damp cloth or sponge to wipe down the slicer’s surfaces, including the blade, guards, and other parts.
How to Sharpen a Hobart 1612 Slicer and Hobart 1712 Slicer
To sharpen the Hobart 1612 and 1712 slicers, there are specific instructions to ensure the best results. Follow these detailed steps to sharpen these models effectively:
Clean the knife surface:
Before starting the sharpening process, it’s crucial to have a clean, dry surface. Clean the knife surface and the area around it to remove any grease or debris.
Set the slice-adjusting dial and remove the grease:
Make sure the slice-adjusting dial is set at zero and the guards are in place. Remove any grease from the exposed portion of the knife, ensuring a clean and dry surface for sharpening.
Prepare the sharpener:
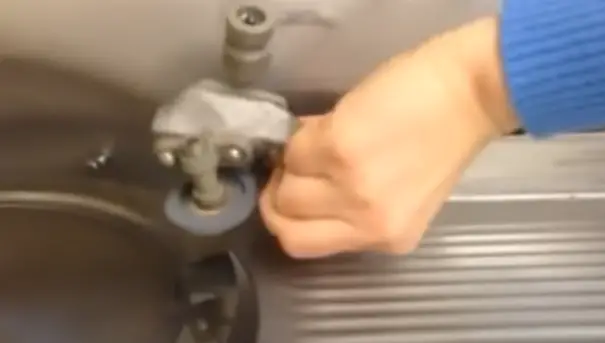
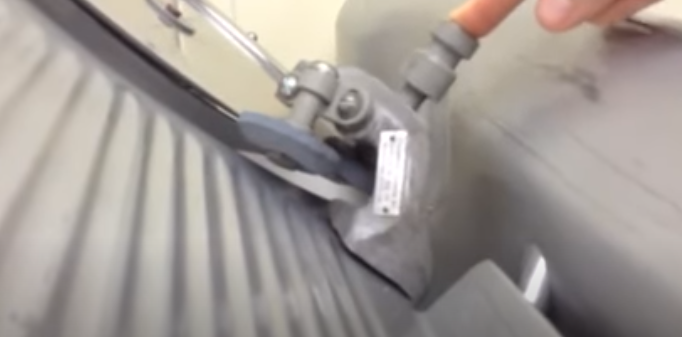
Set the slice adjusting dial at 50 and take the sharpener out of storage. It’s essential to position the sharpener securely into the slot at the bottom of the gauge plate to prevent any rocking movement during the sharpening process. Tighten the thumb screw to ensure it stays in place.
Start the motor and make contact with the grinding wheel:
Begin by starting the motor of the slicer. Slowly turn the slice-adjusting dial to the right, allowing the grinding wheel to make contact with the beveled side of the knife. This ensures that the grinding wheel starts working on the blade.
Check for the development of a burr:
After making contact with the grinding wheel, stop the knife and inspect the opposite face of the knife. Look for the development of a burr, which indicates that the sharpening process is progressing correctly.
Depress the truing wheel:
Once the burr appears, depress the truing wheel for approximately 3 seconds. This simultaneous grinding and truing action helps refine the edge of the blade further.
Turn off the motor and remove the sharpener:
After completing the sharpening process, turn off the motor of the slicer. Remove the sharpener from the slot, ensuring it is securely detached. Return the slice adjusting the dial to zero to reset the settings.
Clean the slicer:
After sharpening, clean the slicer to remove any dust or dirt that may have accumulated during the sharpening process. This step ensures that the slicer is ready for use.
Lubricating Your Slicer between Sharpening Cycles:
To maintain your Hobart slicer’s longevity and reduce stress on the blade, it’s essential to lubricate it between sharpening cycles. Focus on lubricating slide rods, meat grips, and other slicer parts. This simple step will extend the life of your machine and enhance its performance.
FAQ – Frequently Asked Questions
How often should I sharpen my Hobart meat slicer?
The frequency of sharpening depends on the intensity of usage. For commercial purposes, it is recommended to sharpen the blade daily. However, for household use, sharpening once a month should suffice.
Can I use any sharpening stone for my Hobart slicer?
It’s best to use a sharpening stone recommended by the manufacturer or a stone with good reviews. Using the right type of stone ensures the sharpening process is effective and safe for your slicer.
How can I ensure the longevity of the sharpened blade?
To maintain the sharpness of your blade, avoid excessive sharpening as it can cause the blade to wear out quickly. Additionally, proper cleaning and lubrication of your slicer in between sharpening cycles will help prolong the lifespan of the blade.
Can I use any sharpening oil?
It is recommended to use good quality oil, preferably one recommended by the manufacturer, for optimal blade sharpening.
Can I clean the slicer with water?
Yes, cleaning the slicer with water and a dry cloth helps remove dust and debris, ensuring better-sharpening results.
Conclusion:
Properly maintaining and sharpening your Hobart meat slicer is crucial for achieving precise and efficient cutting results. By following the step-by-step instructions provided in this guide, you can keep your slicer in optimum condition. Remember to gather the necessary tools, clean the blade, and install the sharpening stones correctly. Take breaks during the sharpening process to prevent overheating, and ensure you reassemble the slicer and clean it thoroughly afterward. By adhering to these maintenance practices, you can extend the lifespan of your Hobart slicer and continue to enjoy its exceptional performance.
Key Points and Takeaways:
- Regular sharpening of Hobart slicer blades ensures optimal performance.
- Gather the necessary tools: sharpening stone, alcohol, cloth, water, and lubricating oil.
- Clean the blade with alcohol or water and dry cloth before sharpening.
- Follow the manufacturer’s instructions to install the sharpening stones.
- Tighten the lock knob and sharpen the blade for 30 seconds with 4-second breaks.
- Reassemble the slicer, rinse it with alcohol, clean it with water, and lubricate it for smooth operation.
- Lubricate the slicer between sharpening cycles to extend its lifespan.
- Specific instructions apply to the Hobart 1612 and 1712 slicer models.
- Sharpening intervals depend on usage: daily for commercial use and monthly for household use.
References And Citations:
Here are some suggested external links with corresponding anchor text for the above article:
- Hobart Official Website https://www.hobart-export.com/ – Official website of Hobart, the manufacturer of Hobart meat slicers.
- Hobart Slicer Maintenance Guide https://www.partstown.com/cm/resource-center/guides/gd2/how-to-clean-a-hobart-meat-slicer – Detailed maintenance guide provided by Hobart for their slicers.
- Tips for Maintaining Commercial Kitchen Equipment https://newyorkstreetfood.com/kitchen-design/6-tips-to-maintaining-your-commercial-kitchen-equipment-in-pristine-condition/– Useful tips for maintaining various types of commercial kitchen equipment, including meat slicers.

John Hebdon is a food enthusiast, passionate chef, and author of various articles and blog posts related to food and cooking. With a deep love for all things culinary, John’s blog serves as a platform to share his extensive kitchen experiences with a broader audience.
In addition to his culinary expertise, John has a flair for writing and a natural ability to share his passion for food with others. His articles and blog posts are informative, engaging, and packed with practical tips for readers of all skill levels.
As a food enthusiast and writer, John is always on the lookout for new and exciting culinary experiences. Whether it’s trying out a new restaurant, experimenting with a new recipe, or simply sharing a favorite dish with friends and family, John is always eager to explore and share the world of food with others.


