Short answer: To set up a Hobart Tenderizer and Slicer, ensure that the machine is placed on a stable surface. Connect it to a power source, adjust the desired settings, and familiarize yourself with the safety features and operating instructions provided by Hobart.
Setting up a Hobart Tenderizer and Slicer is an essential step before using this versatile machine in your kitchen or commercial setting. The Hobart Tenderizer and Slicer allow you to efficiently tenderize and slice various cuts of meat, saving you time and effort. The proper setup ensures safe and effective operation while achieving consistent results.
Understanding Hobart Tenderizer And Slicer
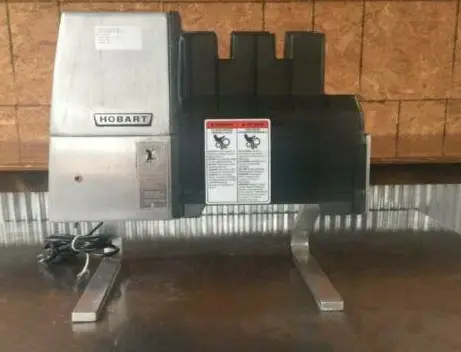
The Hobart 403 and 403U models are meat tenderizers and slicers that are designed to provide reliable and long-lasting performance, given proper usage and maintenance. These machines are equipped with roller units that have blades, which effectively tenderize meat as it is passed through them. It is worth noting that these models have obtained approval for use in establishments that are inspected by the USDA (United States Department of Agriculture). This signifies their compliance with the necessary standards and regulations required for use in professional food preparation environments.
How To Set Up A Hobart Tenderizer And Slicer?
Step 1: Unplug the unit: Ensure the tenderizer and slicer are unplugged from the power source before starting the setup process.
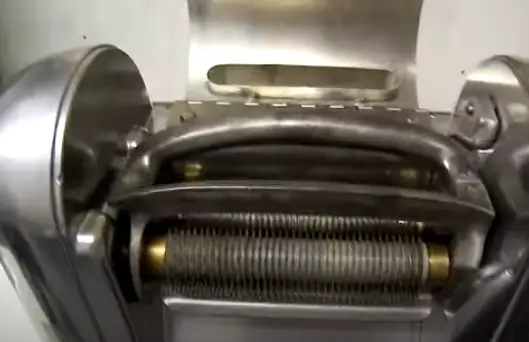
Step 2: Release the hanger locks and lift up the blades: Locate the hanger locks on the machine and release them. Lift up the blades to access and clean them.
Step 3: Clean the blades: Use a brush to clean the blades, removing any meat or debris that may be stuck on them.
Step 4: Spray the components with water and brush off excess meat: Spray water onto the components of the machine and use a brush to remove any remaining meat particles.
Step 5: Rinse off with water: Rinse the components with water to thoroughly remove any remaining meat and cleaning residue.
Step 6: Spray with a disinfectant and leave for 5 minutes: Apply a disinfectant spray to the components and let it sit for 5 minutes to effectively sanitize the surfaces.
Step 7: Rinse off again to remove excess disinfectant: Rinse the components once again with water to remove any excess disinfectant.
Step 8: Dry the blades with a paper towel: Use a paper towel to dry the blades and ensure they are free from moisture.
Step 9: Use compressed air to dry it out thoroughly: If available, use compressed air to blow dry the components and ensure they are completely dry.
Step 10: Apply food-grade grease: Apply a thin layer of food-grade grease to the moving parts and components that require lubrication.

Step 11: Slide the blades back into the slot and line them up on both sides: Carefully slide the blades back into their designated slots and ensure they are aligned properly on both sides.
Important Safety Measures
Never bypass the safety features: It is crucial to never bypass or disable the safety features of the machine. These safety features are in place to protect the operator and prevent accidents.
Keep the transparent guard and motor housing in place: Ensure that the transparent guard and motor housing are always properly in place when the machine is operating. These components provide a barrier between the operator and the moving parts, reducing the risk of injury.
Ensure the switch is off when not in use: When the machine is not in use, always make sure the switch is turned off. This helps prevent accidental startup and keeps the machine in a safe state.
FAQs
Can I use the Hobart tenderizer for bone-in cuts?
No, only boneless meat should be used in the Hobart tenderizer.
How thick should the meat slices be for the tenderizer?
Large slices should be under 3/4 of an inch thick.
Can I use the cleaning fork while the machine is running?
No, it’s unsafe to use the cleaning fork when the machine is running.
What if a blade bends or breaks during operation?
If a blade bends or breaks, do not operate the machine until the blade or blades have been straightened or replaced.
Conclusion
Setting up a Hobart Tenderizer and Slicer is a crucial step to ensure its proper functioning and effective operation. Proper cleaning, disinfection, and lubrication of the components, along with the correct positioning of the blades, will help maintain hygiene, safety, and consistent performance. Remember to refer to the specific instructions provided by Hobart for your model to ensure a successful setup. With the Hobart Tenderizer and Slicer set up and ready to go, you can tackle your meat preparation tasks with ease and precision.

Mario Batali is a renowned author, food enthusiast, and passionate chef who has dedicated his life to exploring the world of culinary arts. With a love for sharing his knowledge and experiences, Mario has become a prominent figure in the food blogging community, inspiring countless readers with his creativity and expertise.
In addition to his culinary prowess, Mario Batali is also a talented writer with a flair for engaging storytelling. He launched his own food blog to share his recipes, cooking tips, and personal experiences in the kitchen. Over time, Mario’s blog gained a loyal following of food enthusiasts who appreciate his unique approach to cooking and his dedication to using only the finest ingredients.
Mario Batali’s passion for food and his commitment to sharing his knowledge with others have made him a true inspiration in the world of culinary arts. Through his blog, cookbooks, and public appearances, Mario continues to spread his love of food and the joy of cooking with his ever-growing fanbase.


