To install the Unger 5 Triple Cut System plates and blades in a mincer, follow these steps: introduce the worm into the mincer, install the cutter plate, place the first blade, install the 13mm plate, insert the second blade, install the end plate, add the spacer, and finalize with the nut. Make sure to follow the instructions carefully and ensure that all components are fitted correctly. Proper installation of the Unger 5 Triple Cut System plates and blades will enhance meat grinding efficiency and deliver optimal results for your culinary creations.
Unleashing the Power of the Mincer with Unger 5 Triple Cut System
This exceptional meat grinder offers outstanding features and benefits for efficient meat-grinding operations. With a high-torque planetary gear motor, it delivers continuous operation and processes up to 1500 kg of meat per hour. Its durable stainless steel construction ensures longevity and hygiene. The versatile mincing plate and integrated knife guarantee precise results, while the smooth running gears ensure stability and productivity. The square design feeding opening enables quicker processing times and efficient feeding. Safety, easy disassembly for cleaning, user-friendly operation, and stability are prioritized.
How to Install the Unger 5 Triple Cut System Plates and Blades in a Mincer?
What You Will Need
- TMP-130 mincer with Unger 5 triple-cut system
- Worm
- Precutter plate (3-hole plate or kidney plate)
- 13mm plate
- Two blades
- End plate
- Spacer
- Nut
Step 1: Introduce the Worm
To start the installation process of the Unger 5 Triple Cut System plates and blades, you need to introduce the worm into the mincer.
Fit the Worm Inside the Axle:
- Make sure you have the worm ready, which is one of the essential components of the Unger 5 Triple Cut System.
- Locate the axle of the mincer where the worm will be inserted.
- Gently slide the worm into the axle, ensuring that it fits snugly.
- Check that the pin on the worm is long enough to secure it properly.
Step 2: Install the Precutter Plate
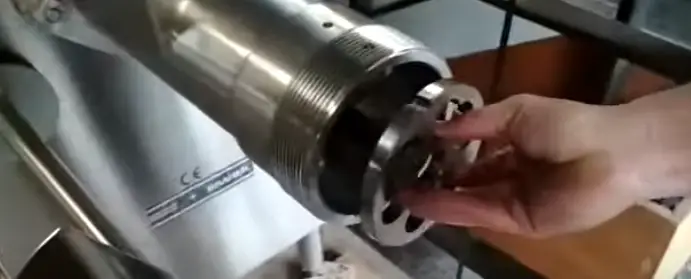
The pre-cutter plate, also referred to as the 3-hole plate or kidney plate, is the first plate to be installed in the Unger 5 Triple Cut System.
Identify the Front Face of the Precutter Plate:
- Examine the pre-cutter plate and locate the text on its side.
- Read the text to determine which face of the plate should be positioned at the front during installation.
- This identification is important for the correct alignment of the cutter plate.
Place the Plate at the End of the Worm Casing:
- Position yourself at the end of the worm casing, where the precutter plate will be installed.
- Hold the precutter plate with the identified front face facing towards you.
- Carefully align the plate with the end of the worm casing, ensuring it sits flush and securely.
Step 3: Install the First Blade
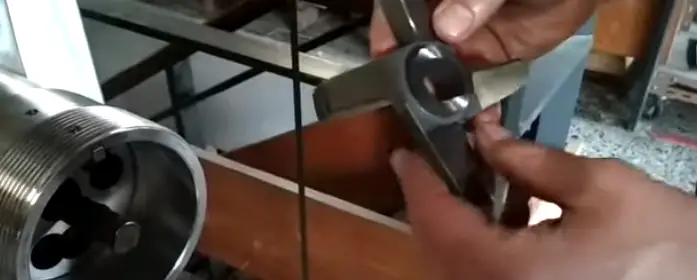
The first blade installation is a crucial step in the process of setting up the Unger 5 Triple Cut System.
Blades Facing Left:
- Before installing the first blade, it’s important to note that the blades should face left.
- As the worm turns anti-clockwise during operation, this orientation ensures optimal performance.
Push the Blade to the End:
- Take the first blade and position it at the designated spot in the mincer.
- Apply gentle pressure and push the blade towards the end, allowing it to slide into the cutter plate.
- Ensure that the blade is securely inserted by listening for a distinct click sound, indicating the male part of the blade has engaged with the cutter plate.
Step 4: Install the 13mm Plate
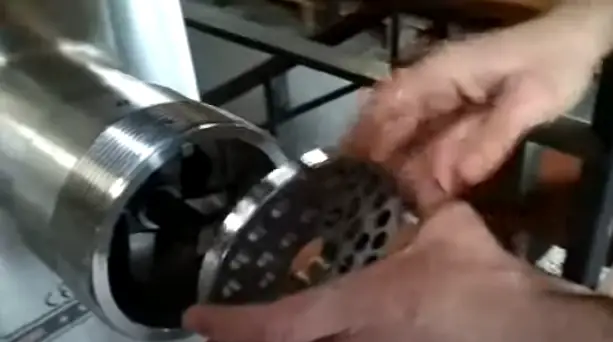
Installing the 13mm plate correctly and ensuring its alignment with the blade is crucial for optimal performance.
Ensure Correct Alignment:
- Take the 13mm plate and inspect it for any text or markings that indicate the correct orientation.
- Align the plate so that it is correctly positioned against the first installed blade.
- Pay attention to the grooves and notches on the plate that correspond to the blade.
Fit the Plate Against the Blade:
- Carefully position the 13mm plate against the first blade.
- Ensure that the plate is snugly fitted against the blade and that there are no gaps or misalignments.
Step 5: Install the Second Blade
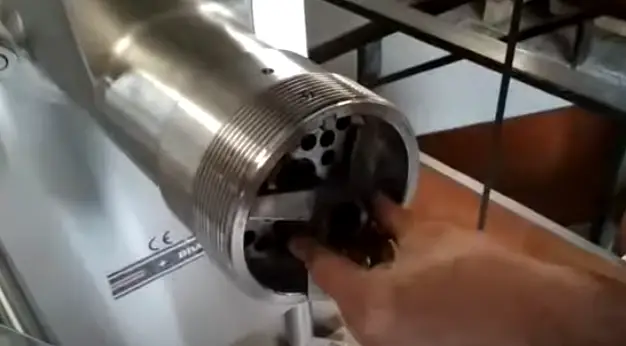
The installation of the second blade is an important step in the setup of the Unger 5 Triple Cut System.
Verify Blade Orientation:
- Before installing the second blade, double-check that the blades are still facing left.
- This orientation is necessary to maintain the proper functioning of the system.
Secure the Blade in the 13mm Plate:
- Take the second blade and align it with the corresponding hole on the 13mm plate.
- Gently insert the blade, ensuring it fits securely into the hole.
Step 6: Install the End Plate
Properly installing the end plate is vital for the functionality of the Unger 5 Triple Cut System.
Align the End Plate:
- Take the end plate and position it at the end of the installed blades.
- Ensure that the end plate is correctly aligned with the blades and sits flush against them.
Secure the End Plate:
- Press the end plate firmly, ensuring it fits securely against the blades.
- Verify that there are no gaps or misalignments between the end plate and the blades.
Step 7: Install the Spacer
The spacer is a crucial component in the Unger 5 Triple Cut System installation process.
Ensure Proper Protrusion:
- Take the spacer and verify that it protrudes from the worm casing.
- The spacer should extend beyond the surface of the worm casing to fulfill its intended function.
Position and Install the Spacer:
- Identify the appropriate position for installing the spacer within the system.
- Carefully insert the spacer into the designated spot, aligning it properly.
Step 8: Finalize with the Nut
The final step involves securing all the components in place with the nut.
Install the Nut:
- Take the nut and position it on the end of the worm casing.
- Begin tightening the nut, ensuring it is threaded correctly onto the casing.
Tighten the Nut:
- Continue tightening the nut until it is securely fastened at the end of the worm casing.
- There is no need to loosen the nut in Unger system mincers, as the plates are set inside a wider side of the worm casing, allowing the worm to move freely with some play.
Properly installing the Unger 5 Triple Cut System plates and blades in your mincer ensures efficient meat grinding and optimal results.
Frequently Asked Questions (FAQ)
Can the TMP-130 Mincer handle tough meat fibers and bones?
Absolutely! The TMP-130 Mincer is designed to handle even the toughest meat fibers and bones, allowing you to prepare sausage, beef, minced lamb, and more with ease.
Is the TMP-130 Mincer easy to clean?
Yes! The machine can be completely disassembled without tools, making cleaning quick and hassle-free. All food contact surfaces are easily cleanable, ensuring hygiene in your kitchen.
What is the benefit of the Unger 5 Triple Cut System?
The Unger 5 Triple Cut System offers enhanced mincing capabilities with its precise plates and blades. It provides efficient and consistent results, making your meat-grinding operations more productive.
Q: Do I need any special tools to install the Unger 5 Triple Cut System plates and blades? A: No, the installation process does not require any special tools. The plates and blades can be installed without additional equipment.
Why is it important for the blades to face left?
The blades should face left because the worm turns anti-clockwise. Ensuring the blades face the correct direction allows for optimal mining performance.
Can the nut be tightened in Unger system mincers?
Yes, in Unger system mincers, the nut can be tightened to the end. The plates are set inside a wider side of the worm casing, allowing the worm to move freely with some play.
Conclusion:
Installing the Unger 5 Triple Cut System plates and blades in a mincer is a simple process that can greatly enhance the efficiency and precision of your mining operations. By following the step-by-step instructions provided, you can ensure that the plates and blades are correctly positioned and ready to deliver optimal results. Regular cleaning of the plates and blades is essential to maintain hygiene and prevent cross-contamination. With the Unger 5 Triple Cut System properly installed, you’ll be well-equipped to handle various mincing tasks with ease and confidence. Enjoy the convenience and quality that this system brings to your culinary endeavors!
Summarized Key Points:
- Introduce the worm into the mincer.
- Install the cutter plate, ensuring it sits correctly at the end of the worm casing.
- Insert the first blade, making sure it clicks into the cutter plate.
- Install the 13mm plate, ensuring it is correctly fitted against the blade.
- Insert the second blade, confirming that both blades face left.
- Install the end plate, ensuring it fits correctly against the blade.
- Install the spacer, ensuring it protrudes from the worm
References And Citations:
Here are some external links, along with the corresponding anchor text:
- Hygiene and Safety Standards – Link to guidelines on hygiene and safety standards for commercial kitchens.
- Proper Cleaning Techniques https://bssa.org.uk/bssa_articles/cleaning-methods-for-stainless-steel/– Link to a guide on proper cleaning techniques for stainless steel equipment.

John Hebdon is a food enthusiast, passionate chef, and author of various articles and blog posts related to food and cooking. With a deep love for all things culinary, John’s blog serves as a platform to share his extensive kitchen experiences with a broader audience.
In addition to his culinary expertise, John has a flair for writing and a natural ability to share his passion for food with others. His articles and blog posts are informative, engaging, and packed with practical tips for readers of all skill levels.
As a food enthusiast and writer, John is always on the lookout for new and exciting culinary experiences. Whether it’s trying out a new restaurant, experimenting with a new recipe, or simply sharing a favorite dish with friends and family, John is always eager to explore and share the world of food with others.

